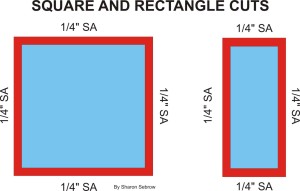
¼” on top and ¼” on the bottom. That means the length of the square has increased by ½”. ¼” on the right side and ¼” on the left of that same square. That means we have increased the width of the square by ½”.
So, regardless of the size of the square, we add ½” to the desired finished size to get the size we need to cut to have the necessary seam allowance.
The same seam allowance rule would be true for a rectangle. Adding ¼” to each the top and bottom and both of the sides, means we are adding ½” to the width and ½” to the length to get the cut size of the rectangle.
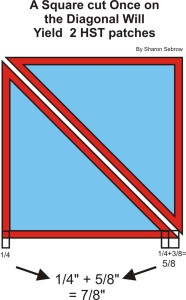
As you can see in the illustration, along the bottom/top edge and sides of the triangles, there is enough fabric for 1/4” SA, but not the diagonal cut edge. Not only have we lost the seam allowance altogether on the diagonal, but there is also, now, not enough for the corners where there used to be. We must add the missing difference of 3/8”, as shown in the illustration. This bit extra will give us what we need to sew the diagonal with 1/4” SA.
In order to get this extra 3/8”, we must calculate the total amount needed for SA and add this to the finished size of the square patch that will be cut on the diagonal for the 2 triangles.
3/8” added to the typical 1/2” makes 7/8”. By adding 7/8” to the finished size of a square will allow us to cut the square of fabric once on the diagonal, yielding the 2 HSTs. Each the correct size for sewing the quilter’s 1/4” SA on all three sides of the triangle.
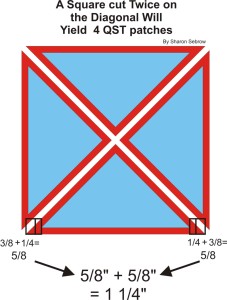
QSTs, are cut twice on the diagonal. If one cut needed an additional 3/8″, the second cut also needs an additional 3/8”. As you can see in the illustration, the missing difference of 3/8” is at both angled corners (the ‘right angle’ here is at the top and doesn’t need any additional SA).
1/2” 3/8” 3/8” = 1 1/4”. By adding 1 1/4” to the finished size of the patch, it will allow us to cut a square of fabric twice on the diagonals, yielding the 4 QSTs, all the correct size for sewing the quilter’s 1/4” SA on all three sides of each triangle.


