
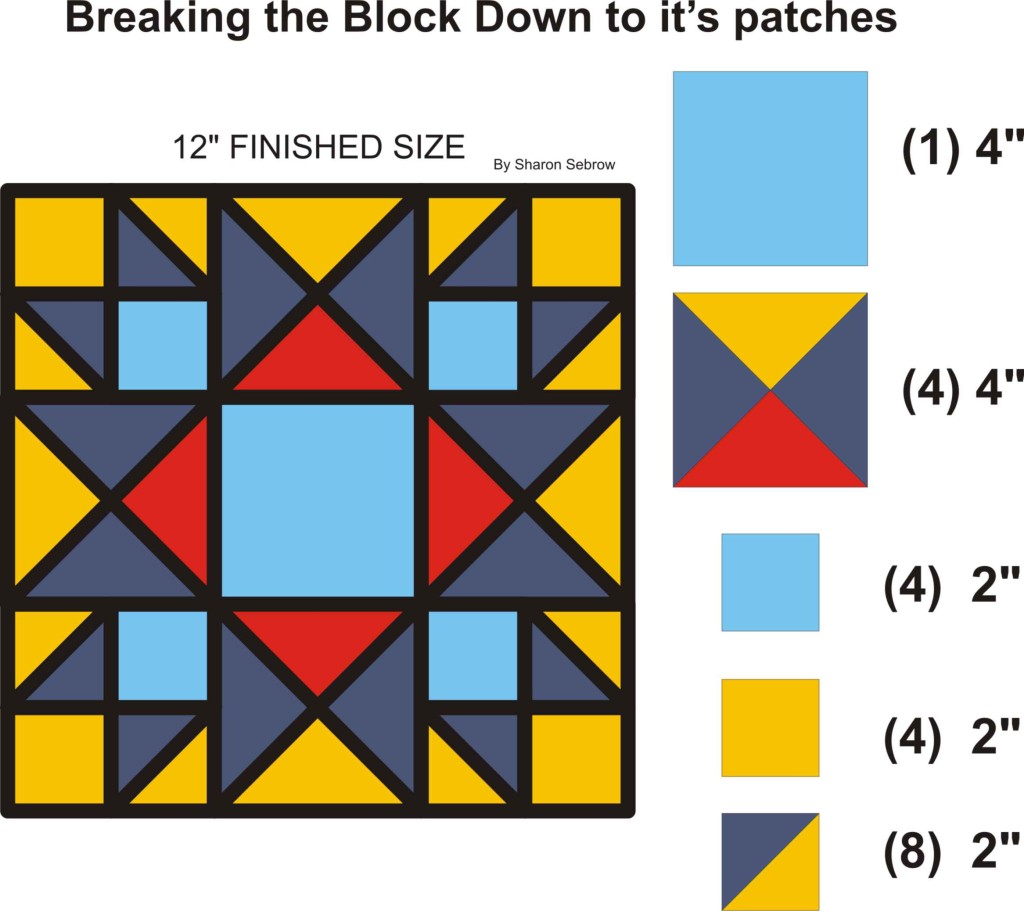
Now that you understand the concept of breaking down blocks to their grid, you can more easily understand what it would be to break the block down to the patches of fabric that make it up.
We will break down a traditional block to the patches. As you see the list of patches there are large and small of the same patch. That is because there are different sizes of the same shape. These all must be accounted for. Luckily, the large is twice the size of the small, so it will be pretty straight forward when we chart it all out.
Now that we have the parts that make up the whole, we can start to fill in the chart.
As we move into the Charting section, please do not be scared off by the numbers.
It is all very simple arithmetic, but a calculator will take away any math issues.
If you follow the instructions, step by step, you’ll be able to do this with no problems.
Please, give it a shot and have faith. It is SOOOO much easier than it looks.
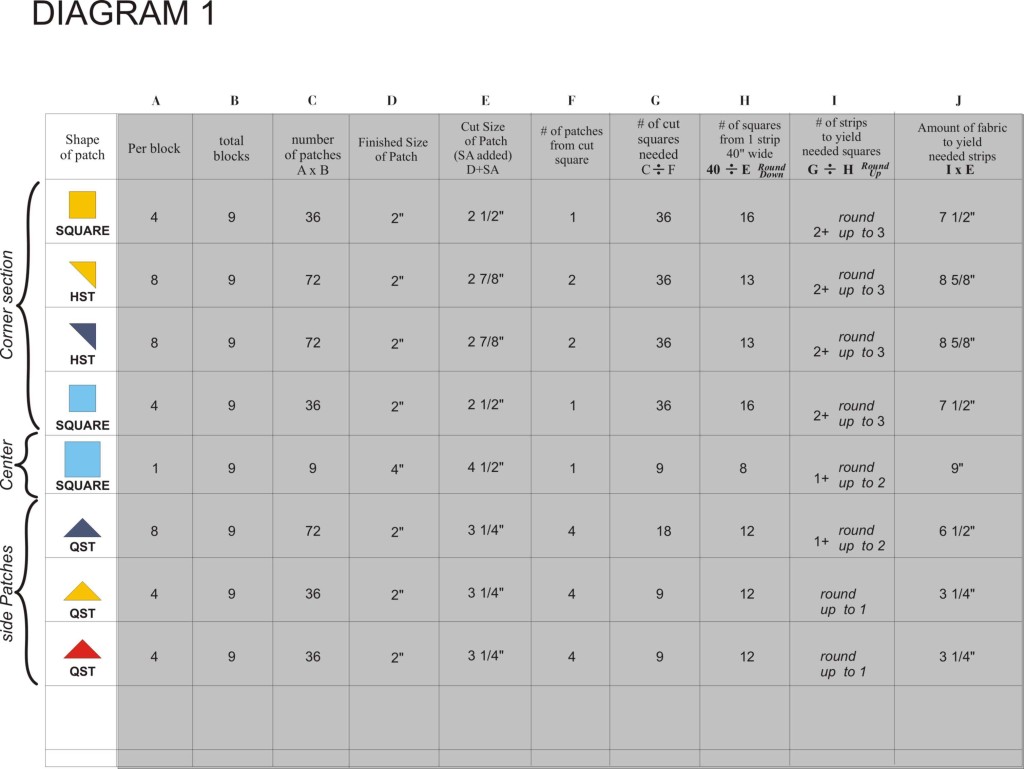
As you break down a block, you will add information to a worksheet that I have created so everything you need is right there in front of you.
The work sheet you are looking at right now, has already been completely filled out with the information for this particular block. As we move through each diagram the highlighted area is what I would like you to focus on. the shaded area will not be relevant at that time. For the purpose of this exercise, I will concentrate on the yellow fabric, and the yellow patches in this block. The chart would be completed and used for all the fabrics and patches in the same way I am about to demonstrate.
In the first column, you see I have taken note of each patch of fabric in the block and noted its shape. I have used the abbreviation of HST for half square triangle and QST for quarter square triangle. Note that I have not given this column an identifying letter at the top.
Working one patch at a time:
In the second column, Column A, I have noted how many of each patch shape is used in 1 block. In the third column, Column B, I have noted how many blocks I plan to make.
In the fourth column, Column C, I have multiplied Column A and Column B to determine the total number of patches of that particular shape that will be necessary for all the blocks in the quilt top.

We will write in the desired FINISHED size of the patch in Column D.
In Column E we will add the necessary seam allowances to the finished measurements in column D. ½ for squares or rectangles, 7/8” for half square triangles, and 1 ¼” for quarter square triangles.
In Column F is where we will note how many of the desired shape we will get from the cut square. A square would be 1: for half square triangles, you will get 2 from a single square: and you will get 4 quarter square triangles from a single square.
Column G will tell us the number of squares needed to be cut, in order to yield the number patches of a specific shape for all the blocks in the quilt top. We get this number by dividing the number of patches needed, by the number of patches we would get from a single square. Column C divided by Column F.
So the first patch is a square, we would get only 1 from each square cut, we will need a total of 36 squares, so we will need a total of 36 cut squares.
The second patch is a half square triangle. We would get 2 from each square cut, and we need a total of 72 triangles. Column C : 72 divided by column F: 2 = 36 cut squares.
The third patch is a quarter square triangle. We would get 4 from each square cut, and we need a total of 36 triangles. Column C : 36 divided by Column F: 4 = 9 cut squares.
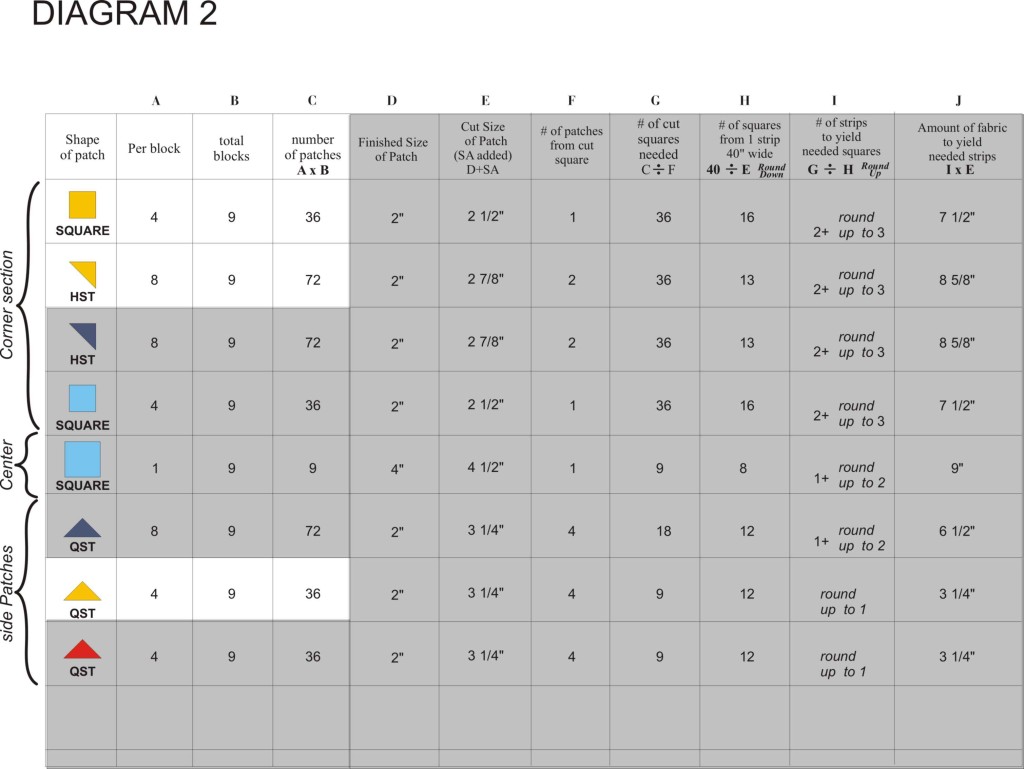
Now we know what we need to cut, but we haven’t figured out the fabric amounts yet or how we will cut all these squares.
We’ll continue with the Chart in the next segment of Quilter’s Math Part 3B.