
At this point, I’ve covered how to break apart a block to its individual parts; how to use that information in the Quilt Block Pro chart for calculating fabric and to create a cutting plan for the blocks in your quilt.
Resizing an existing block should be a breeze!
Let’s start by breaking the block down to the grid. When you do this you are simplifying it in a way that will make the size adjustments much simpler to deal with. It also makes it easier for us to use sizes that the blocks will divide into evenly.
A block with a 3 x 3 grid can easily be any size divisible by 3 – 3”, 6”, 9”, 12” etc.
A block with a 4 x 4 grid can easily be any size divisible by 4 – 4”, 8”, 12 etc. however, that does not mean that you cannot have a 9” 4-patch block. It just means you may be dealing with measurements that have fractions. When you start reducing blocks and get sizes with 1/16th inch or even 1/8 inch, you may decide to adjust the size of the block slightly larger or smaller, just for the simplicity of the math and ultimately the cutting involved.
To enlarge or reduce a block, take the desired finished size of the block and divide it by the number of parts of the grid.
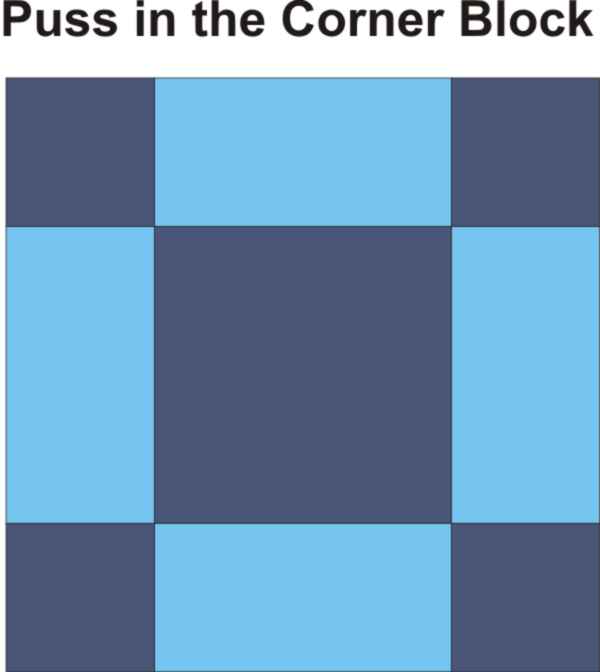
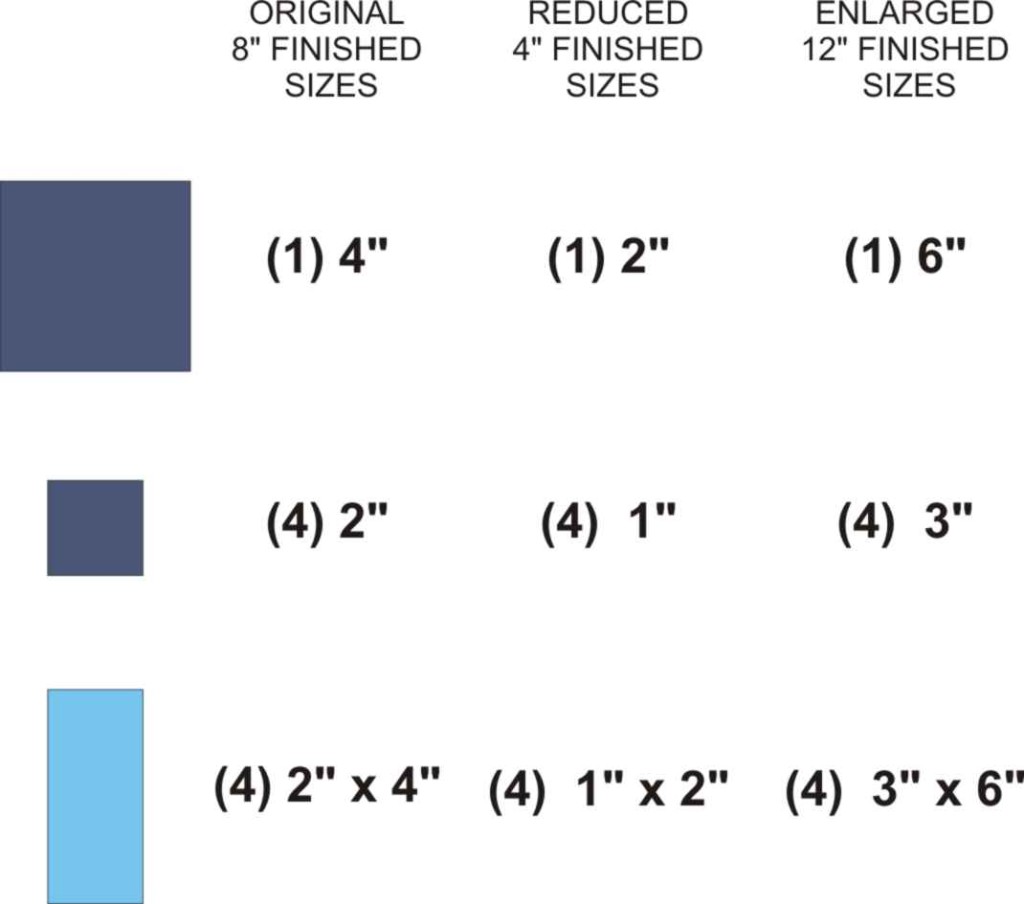
Let’s say I want a 12″ block and my block grid is a 4 x 4: so I divide 12 x 4 and get 3. 3″ is the finished size of each grid box for my new block size.
The corner squares are finished 3″ (add SA and cut 3 1/2″ squares)
The center square which sits over a 2 x 2 part of the grid will be 2 x 3″ making it a 6″ finished square (add SA and cut 6 1/2″ square)
The side rectangles sit over a 1 x 2 part of the grid, so it will be 3″ x 6″ finished rectangle (add SA and cut 3 1/2″ x 6 1/2″)
If I want a 4″ block, I would divide 4″ x 4 (the grid) and find that each grid box is a finished 1″.
The corner squares are finished 1″ (add SA and cut 1 1/2″ squares)
The center square which sits over a 2 x 2 part of the grid will be 2 x 1″ making it a 2″ finished square (add SA and cut a 2 1/2″ square)
The side rectangles sit over a 1 x 2 part of the grid, so it will be 1″ x 2″ finished rectangle (add SA and cut 1 1/2 x 2 1/2)
The following block is more complex because there are lots of shapes and patches of different sizes used in this block creating a ‘mini’ block in each of the corners which need to be worked out separately.


Here we have a grid that is basically a 9 patch or 3 x 3 grid.
If we want a 6″ finished block, we would divide 6 by 3 (the grid) and find that each box of the grid will be a finished 3″. So our center is a 3″ square and our side QST patches will finish at 3″ as well.
The corners are each made up of smaller patches. the squares and HSTs. If you take this corner 3″ grid box, and break IT down to a ‘mini’ grid, you will find that it is a 2 x 2 grid. The corner is a finished 3″, so 3 divided by 2 (the ‘mini’ grid) will give us a finished 1 1/2″ finished ‘mini’ grid. Each of the corner’s squares will be a finished 1 1/2″, as well as, the corner’s HST patches.
If we enlarge this block to 12″, we would divide 12 by 3 (the grid) and find that each box of the grid will be a finished 4″. So our center is a 4″ square and our side QST patches will finish at 4″ as well.
The corner pieces will be 4″ divided by 2 (the ‘mini’ grid) giving us a finished 2″ ‘mini’grid measurement.
Each of the corner’s squares will be a finished 2″, as well as, the corner’s HST patches.
When we start to add SA, we need to remember that the squares we will cut to make our side QST patches will start 1 1/4″ larger than the finished size; and the squares we will cut to make our corner’s HST patches will start 7/8″ larger than the finished size.